Two years ago I made a dress for my daughter for Easter. She went bananas for it, and has been asking me to make her more clothing forever. I decided to try and create my own dress for her, which did not go well and ended up being a skirt instead. A cute skirt though! So here is the pattern for my failed dress aka my successful skirt!
“We don’t make mistakes, just happy little accidents.”
―
- If you’d like to purchase the PDF for this pattern, it is available HERE in my Etsy shop! I sell the PDF as a way of making just a tiny bit of money while I am a stay at home mom. The PDF is downloadable, printable, and a lot less wordy and picture-y than my blog post!

What You’ll Need:
Yarn – I used two full skeins of Loops and Thread Kai yarn in Birthday Cake. It’s a lightweight 3 yarn and is variegated perfectly for this project!
Hook – H Hook (5 mm)
Tapestry Needle
Stitches You Need to Know:
Chain (ch)
Single Crochet (sc)
Half Double Crochet (hdc)
Double Crochet (dc)
Slip Stitch (slst)
The Pattern:
I made the band around the waist in two pieces. So you will need to make two panels and slst the sides together OR just make one long band piece. It’s completely up to you and whether you want one seam running down the back, or two seams down the sides.
The Waistband: You need to measure your person, or look up a measurement chart online to see the average size of the kid/adult you want to make one for.

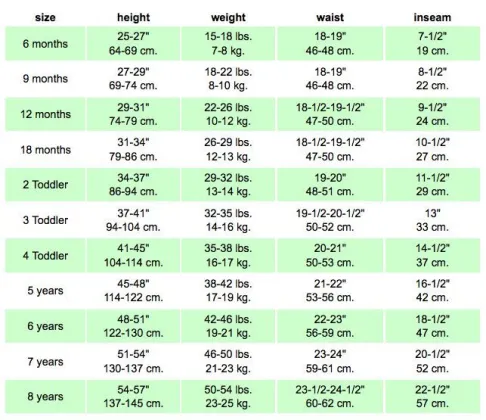
My daughter has a 22″ waist, so I made two panels that were each 11″ wide. I’d suggest sticking as close to the measurement as possible, or possibly going slightly under. The stitches will stretch, but if it’s too big it will be hard to adjust to fit.
Row 1 – Start with a chain that measures the length you need. It doesn’t matter if it’s an odd or even number of stitches. Remember the amount of chains you started with so that you can match your second panel (if you are doing one long panel, you don’t have to remember your stitch count).
Row 2 – sc in second chain from hook. sc in each ch st across. ch 1 (always counts as first hdc), turn (measure here too, just to make sure your tension isn’t changing the length too much. You do not want to be 12 rows in before you realize it’s working up too big/small).
Row 3 – hdc in each st across, ch 1, turn
Row 4 – *Continue hdc’s back and forth until your waistband measures 4″ in height. You can, of course alter this length to make it a thinner waistband. I really like the look and the fit of the thicker waistband, but it’s completely your call. Go with your creative instincts!

Finishing the Waistband – Once you’ve completed your two panels, slst the sides together, making sure to match the bottoms of each panel (where your starting chain was) so that you have a consistent look. If you made one panel, slst the sides together.

The Skirt:
Row 1 – Attach your yarn to any stitch in the bottom (where your starting chain was) of the waistband (I prefer to start at a seam) and ch 1, sc in each st across, slst to ch 1
Row 2 – ch 2, dc in same st, ch 1, 2dc in next st, ch 1, *2dc in next st, ch 1* *Continue around*, slst to top of ch 2 space, slst into top of dc space, slst into ch 1 space
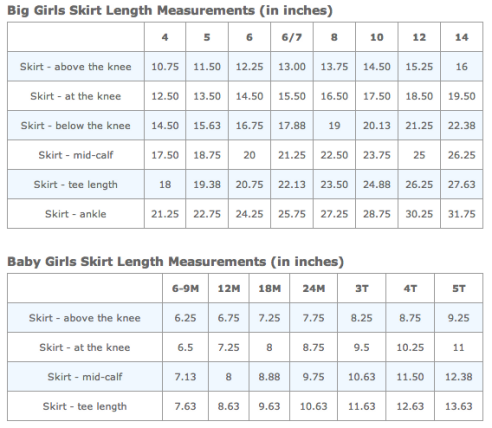
Row 3 – Repeat row 2, being sure to put your dc stitches in the ch 1 spaces from the previous row, until your skirt measures your desired length. My skirt measures 12″ total, so 4″ for the band, and 8″ for the “skirt”. Mine was made to fit a 6 year old, so check the chart below to find the perfect length for your project!
There you have it! A beautiful Emilia skirt ready to go!

You may sell anything your make with my pattern, but please do not use my pattern or pictures as your own. Thank you.
Find me on Facebook here.
Find me on Instagram here.
Bookmark this pattern on Ravelry here.

Super cute 🙂 thank you for sharing!
LikeLike
I’m really confused by this pattern. When I started the skirt, it says that you 2dc and chain 1 in each stitch around. Doesn’t that mean that you are tripling the number of each stitch in each round? So, if you have 70 stitches, then next round, you’ll have 210, then next round 630 and so on. It’s taking me hours to do one round.
LikeLike
Thanks for bringing this to my attention, it is written a little wonky. I’m surprised no one has mentioned it yet! Row 3 and on will be *2dc in chain sp, ch 1* *repeat around*, so after the initial row 2, which purposely adds lots of extra stitches to make the skirt look fuller, the other rows will all have the same amount of stitches as row 2.
Let me know if this doesn’t make sense. I have two kids screaming and my brain is a bit tired! 🙂
LikeLike
I hate doing seams so I started with a sc foundation chain (gives a little extra stretch too), joined with a slight st to first sc to make a band. Ch1, turn, hdc in first st and each stitch around, sl st to first sl st. There was no need to join the yarn to continue with the pattern. It worked out great!
LikeLike
Awesome! I’m glad you found a way that works best for you! Thank you for sharing. 😍
LikeLike
I really don’t get this part under skirt, row 2: “slst to top of ch 2 space, slst into top of dc space, slst into ch 1 space”.
Does it mean:
slst into space of chain 2 and then slst into the chain space between the first dc and second dc, and then skip the 2 dc, and chain a slst into the next chain again?
I think I’m getting confused by the “top of”. What is the top of a chain?
LikeLike
The instructions mean to slst into the second chain in the initial ch2 of that row, then slst into the top of the DC stitch, meaning the stitch space you’d normally stitch into on a continuing row, and then slst into the ch 1 space.
Basically what you’re trying to do it get into the ch1 space to start your next row of stitches from there, so you are going to slst across those first three stitches you made (ch2, DC, and ch1) to get to that point.
I’m not sure if that helps or if it sounds just as confusing? If it still seems weird, let me know and I’ll try to help more!
LikeLike