Hello, everyone! I’ve come up with a very beautiful hat pattern for you all, and I think you’re going to like it! I’ve named it “The Bert,” as a joke, because a friend noticed that the gold and black hat in the picture below looks a lot like Bert from Bert and Ernie on Sesame Street. Once that connection was made, it was over, and everyone is now calling it The Bert! I hope you all enjoying making your own Bert to enjoy, and to gift to those you love!
~~~ It’s very important you all know ahead of time that my tension is very tight! This pattern will not have exact stitch counts because my tension will not work for the majority of you. Please read my gauge information to be sure your hat works up in a way that will mimic the same look as mine. ~~~
If you’d like a simplified version of this pattern to download and print, you can purchase it through my Etsy shop here!

What you’ll need:
Yarn – I’ve used a few different yarns to make these hats. I found that I need 1 skein of Loops and Threads Impeccable or Hobby Lobby’s I Love This Yarn, or 2 skeins of Vanna’s Choice. (In the pictures above, I used Vanna’s Choice in Dusty Blue, and Loops and Threads Impeccable in Gold, Deep Forest, and Sweet Rose).
PomPoms – I used these Faux Fur Pom Pom Balls. They are amazing, and come with a tiny loop that makes it SO EASY to attach to your hat! (I am never making yarn pom’s again!)
Crochet Hook J/10 ** update – after much feedback, I think it’s important to note that the majority of people are coming out with a hat that is MUCH too slouchy. I believe the best hook size might be an H, or even a G if your tension is really loose. I appreciate all the feedback and hope you will all check the gauge as you go!**
——————————–
Stitches you need to know:
– Single Crochet (SC)
– Single Crochet Back Loop Only (sc blo)
– Double Crochet (DC)
– Slip Stitch (slst)
– BPDC (Back Post Double Crochet – Learn how here)
– Bobble Stitch – yo, insert hook into stitch, yo, pull through stitch, yo, pull through two loops, (2 loops on hook) yo, insert hook into same stitch, yo, pull through stitch, yo, pull through two loops, (3 loops on hook) yo, insert hook into same stitch, yo, pull through stitch, yo, pull through two loops, (4 loops on hook) yo, insert hook into same stitch, yo, pull through stitch, yo, pull through two loops (You will now have 5 loops on your hook), yo, pull through all five loops on hook.
Gauge:
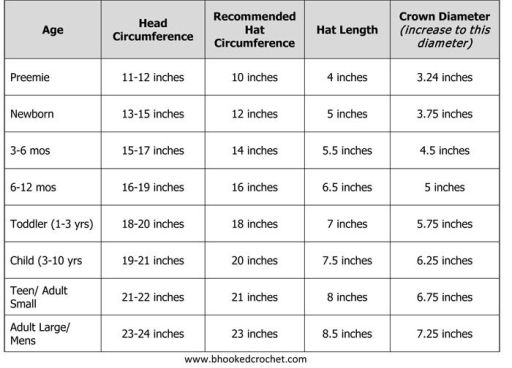
Band gauge – 2.5″ wide, and the length will be whatever the circumference is for the hat you need, minus 1/2 – 1″ to allow for a nice stretch.
Row gauge – 1.5″ for every five rows up from the band.
My Bert with a pompom has a finished height of 8.25 – 8.5″ before closing and adding the pom.
The Bert Pattern:
Start with the band:
– Chain 12
Row 1 – sc in chain closest to the hook, sc in next ten chains (11)
Row 2 – Chain 1 (counts as first sc), sc blo in each stitch across – (11)


Row 3 – End: *Repeat Row 2 until your band measures the size you need*
** Example for band sizing: I’ve been making adult women hats which need a circumference of 21-22. I make my band 20.5″ so that the hat band will fit snug onto a head and have a little stretched look to it. You can make it whatever size is right for your project. If you aren’t sure what the circumference needs to be, check out a sizing chart online. Or, check out my personal favorite right here (this will also help you to know your hat height!)…
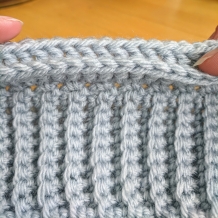
Finishing the band: Be sure to end with an odd number of rows on your band. Slip stitch the band ends together. (You will end with your starting tail and your working yarn at the same point). Flip the band inside out so that the bump from the join is on the inside.


Starting the hat:
You do not need to cut your yarn to start the hat, you can just continue on without stopping (Yay! Less ends to weave!)!
Row 1 – Chain 1, sc in each band row around, slip stitch into chain 1 space (The number of stitches here will be the number of stitches for every row, unless you are finishing this as a messy bun hat. Instructions for decreasing for a messy bun hat will be listed in the instructions below)

Row 2 – Chain 2, dc in each stitch around, slip stitch into top of chain 2 space

Row 3 – Chain 2, bpdc around each dc post from previous round, slip stitch into top of chain 2 space
Row 4 – Chain 2, bpdc around each bpdc post from previous round, slip stitch into top of chain 2 space

Row 5 – Chain 1, *Bobble stitch in next stitch, sc in next stitch* *Repeat around*, slip stitch into chain 1 space.
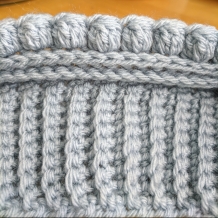
Row 6 – Chain 1, sc in each stitch around, slip stitch into chain 1 space
Row 7 – Chain 2, dc in each stitch around, slip stitch into top of chain 2 space
Row 8 – Chain 2, bpdc around each dc stitch post from previous round, slip stitch into top of chain 2 space
Row 9 – Chain 2, bpdc around each bpdc post from previous round, slip stitch into top of chain 2 space
Row 10 – Chain 1, *Bobble stitch in next stitch, sc in next stitch* *Repeat around*, slip stitch into chain 1 space.
Row 11-15 – Repeat rows 6-10
** If you want to finish this as a messy bun hat, please skip past instructions for row 19 to “How to finish you messy bun Bert”**
Row 16 – Repeat row 6
Row 17 – Repeat row 7
Row 18 – Repeat row 8
Row 19 – Repeat row 9 – Last row for hat if you’re adding a pompom
Close top of hat (I use this method, except I use a tapestry needle instead of a hook), and attach pompom. Weave in ends.
How to finish your messy bun Bert
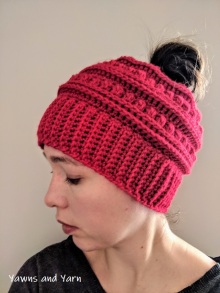
Row 16 – ch 1, sc2tog around, slst into ch1
Row 17 – ch 1, sc in each stitch around, slst into ch 1
*Now, this is where tension might play a factor in your next step. If you are like me, and you have a very tight tension, you may have had 80+ stitches in each row of your hat. If that is the case, then move on to instructions for Row 18 to continue decreasing your opening. If your hat had less than 60 stitches per row, your opening might be small enough already and you can finish off your hat by weaving in ends. If your opening is just a bit too big, but not big enough to decrease by half of the stitches again, then do another row of mostly sc with a few sc2tog to decrease the size of the hole a little more.
Row 18 – ch1, sc2tog around, slst into ch 1 – Finish off hat. Weave in ends.
Wha-la! A gorgeous Bert hat is now your very own!
You can sell your finished work, but please remember to give me credit for my pattern, and never use my pictures to promote your work. Thank you!

If you’d like a simplified version of this pattern that you can download and print, you can find it in my Etsy shop here!
Bookmark this pattern on Ravelry here!
Find me on Instagram here!
Find me on Facebook here!
*As an Amazon Associate I earn from qualifying purchases made by shopping with the links provided in this post.*

Maybe I’m missing it, but where is your gage information that you reference in this pattern?
LikeLiked by 1 person
I’ve updated the post! Thank you again so much for letting me know!
LikeLike
Sorry, it appears that the update with the gauge didn’t take! My band is 2.5″ wide and every five rows up from the band is 1.5″.
I’ll be sure to update this tomorrow. Thank you for bringing it to my attention!
LikeLike
Love this pattern thank you so much for sharing….we adopted four children at work for Christmas and are all teens gonna make them each a hat with this pattern
LikeLike
That is amazing! Thank you so much for sharing this with me. ❤️
LikeLike
Should your first row of sc after the band have an even # of stitches or an odd #? Does it matter? Thanks!
LikeLike
It should have an odd number, but I will tell you that I’ve had an oopsy where it turned out to be an even number and it worked out just fine! The bobbles along the seam will be a bit squishy, but not in a hugely noticeable way, especially with the slst to ch1 between them to break them up a bit.
LikeLike
I might just be missing it, but what weight yarn did you use?
LikeLike
I used Vanna’s Choice and Loops and Threads Impeccable, which are both worsted weight 4. 😊
LikeLike
Hi and Merry Christmas🎄
Do I have to add a pom on top or is it optional? I’m making this as a gift and she doesn’t want the pom. Thanks so very much!
LikeLike
It is optional! 😊
LikeLike
I have doubts on how to close the hat, do you have any instructions???
LikeLike
Hello! I am so sorry for the delay in responding! I like this way of closing best, but instead of using a hook, I use a tapestry needle. I find it to be a lot easier! Especially if you have a tight tension, like me! 😊
LikeLike
THank you for sharing your pattern. I have loved making it, and love the textures the pattern provides!! Thank you again!
LikeLike
You are very welcome! I am so glad you are enjoying it! 😊
LikeLike
Awesome pattern!! Have had no trouble whatsoever and I’ve made 5 so far 😀
LikeLike
That is amazing!!! Thank you so much for letting me know! 😍😍😍
LikeLike
I love this pattern! Super cute! Only thing is my hat came out pretty stiff. Would a light weight yarn work for this pattern too?
LikeLike
I’m not sure, I haven’t tried it with anything but worsted. I like the stiffness of it for the details, but I think a light weight yarn would give it a nice look too. If you try it with a lighter weight yarn, please let me know how it turns out! 😍
LikeLike
I tried it with a lighter weight yarn. I used a mandala cake which is a size 3. It turned out really cute. Only thing I would change is to add one more repeat of the rows or make the brim a little bit longer as it did end up a little shorter than when worsted weight is used. I did take pics but I guess I’m not able to post them to show you.
LikeLike
If you are on Instagram you can send them to me! I’m @yawnsandyarn 😊
LikeLike
Love crocheting this hat. I used a soft navy blue yarn. K hook. A black-grey pom-pom on top. A fleece material inside. I used a 3″ strip at the botton of hat for warmth in the colder months
LikeLike
That sounds beautiful! I love the idea of adding fleece! I’m so glad you enjoyed the pattern! 😊
LikeLike
What a lovely design – and so well explained and easy to follow. Thank you so much for sharing this with us!
LikeLike
Thank you so much for your wonderful comment! 😍 So glad you are enjoying the pattern! 😁
LikeLike
Hi. I don’t see anywhere it says to turn your rows on the body of the hats. If I don’t turn the bobbles face the inside of the hat. I am going to frog back to the sc row and try turning rows.
LikeLike
I do not turn the rows, my bobbles typically come forward as I do them, but if yours go inwards, just push them forward from behind after the sc stitch. 😊.
LikeLike
Turning rows will not work for the stitches in this hat. It will lose the texture of the bpdc stitches.
LikeLike
I was not able to have my bobbles looks like the pictures so I did ”ch.1 and turn” on rows 5&6, 10&11 and 15&16 only. I was crocheting in rounds for the rest… the result is like your photo. I’ll try to add a picture of it on instragram.
LikeLike
I’d love to see it! That’s a good alternative way to do it with the bobbles! 😊
LikeLike
Nikki:
The pattern is adorable. I’m working on my first “Bert”. Maybe I’m missing something, but working the bobble stitches as I read the pattern puts the bobble on the inside of the hat. I’m fairly new to crochet.
Am I supposed to turn the work before starting the bobble row? Or did I make an error in flipping the headband after connecting the 2 sides and working on the right side? I need some guidance, please.
LikeLike
Bobbles do naturally tend to go inwards, but if you just push them forward from the back after making the sc stitch they will be just fine! 😊
LikeLike
Is pattern available in printed version please? Thanks much!
LikeLike
Not yet, but I will be working on that as well as a video tutorial soon. 😊
LikeLike
Is written pattern available yet please? Thanks so much!
LikeLike
Not yet! I will be working on it soon, I promise! Just got my little one out of the house a couple times a week to give me some peace, so I will be working on it soon! Thank you so much for your patience, I know it’s taking forever!
LikeLike
I have FINALLY got a simplified version of the pattern written up into a PDF on my Etsy shop. It can be downloaded and printed. It’s three pages long and does not contain the detailed pictures. I tried to keep it as simple as possible so that it can be printed without being way too long! https://www.etsy.com/listing/704741452/the-bert-hat-crochet-pattern-pdf-closed?ref=shop_home_active_1
LikeLike
Don’t you have to turn the row when doing the bobble? Mine is on the wrong side if I keep doing it in the round
LikeLike
You don’t have to, but you can. I push mine forward on purpose so that I do not have to turn my work, but turning your work so that the bobbles fall naturally towards the back is just fine. (They are definitely supposed to fall towards the back, so yours are working up just as they are intended. I’m just difficult and force mine forward to make everything flow easier for myself.)
LikeLike
So after getting to the second round of bobbles, I sat back and assessed that my hat was resembling a mushroom way too much. LOL! This is also my first time doing bpdc. So I frogged a bunch of yarn and turned on the Christmas music, tightened my grip on my hook (I read your advice and used a H hook from the start), grabbed a “take no prisoners” attitude and attacked. It is looking more promising now. I tightened my stitches as well as you said you have a tight tension. My first attempt looked like it was trying to turn itself inside out. I will win this fight. I really love your hat and I am determined. Also, I love that you named it Burt. I am a sesame street kiddo.
P.S. I popped my bobbles all on my own before reading the comments. I knew where it was going. 😉
LikeLike
This is one of my all time favorite comments! I would love to see your finished Bert! I know it will be extra special because of all this determination and Christmas music jamming!
LikeLike
This pattern and the pic seem to be total opposites in instruction
In the end I made up my own pattern in accordance with the pic
I really felt let down
LikeLike
I’m sorry you felt let down with the pattern. I do have step by step instructions with photos to make sure that you can see the pattern working up with each row.
I’m glad you were able to figure out your own way to work it up though. If you ever have any questions or need any help, you can find me on Instagram or Facebook.
LikeLike